


Spray Finishing Problems: Dry Spray
I’m going to go out on a limb and make a blanket statement here:
Everyone who sprays finishes encounters finishing problems.
It doesn’t matter if they’re skilled, beginner and yes, even pro. The simple fact is that occasionally, and especially when we’re in a hurry and don’t follow standard spray finishing protocols, or when using a new finish, technique, or piece of equipment — a finishing problem will crop up. It’s just something we must learn to live with. So when (not if…) a finishing problem happens, I always fall back onto my three-step finish problem resolution process:
-
- Identifying what the problem is
- Dealing with it
- And of course, most important of all is the third and final step: understanding what caused the problem in the first place and taking corrective measures so that it won’t re-occur
In this four-part mini-series on spray finishing problems, I will cover the most common finishing problems you’ll come across: dry spray; orange peel; striping; and fisheye. I’ll tackle each of them using my three-step problem resolution process.

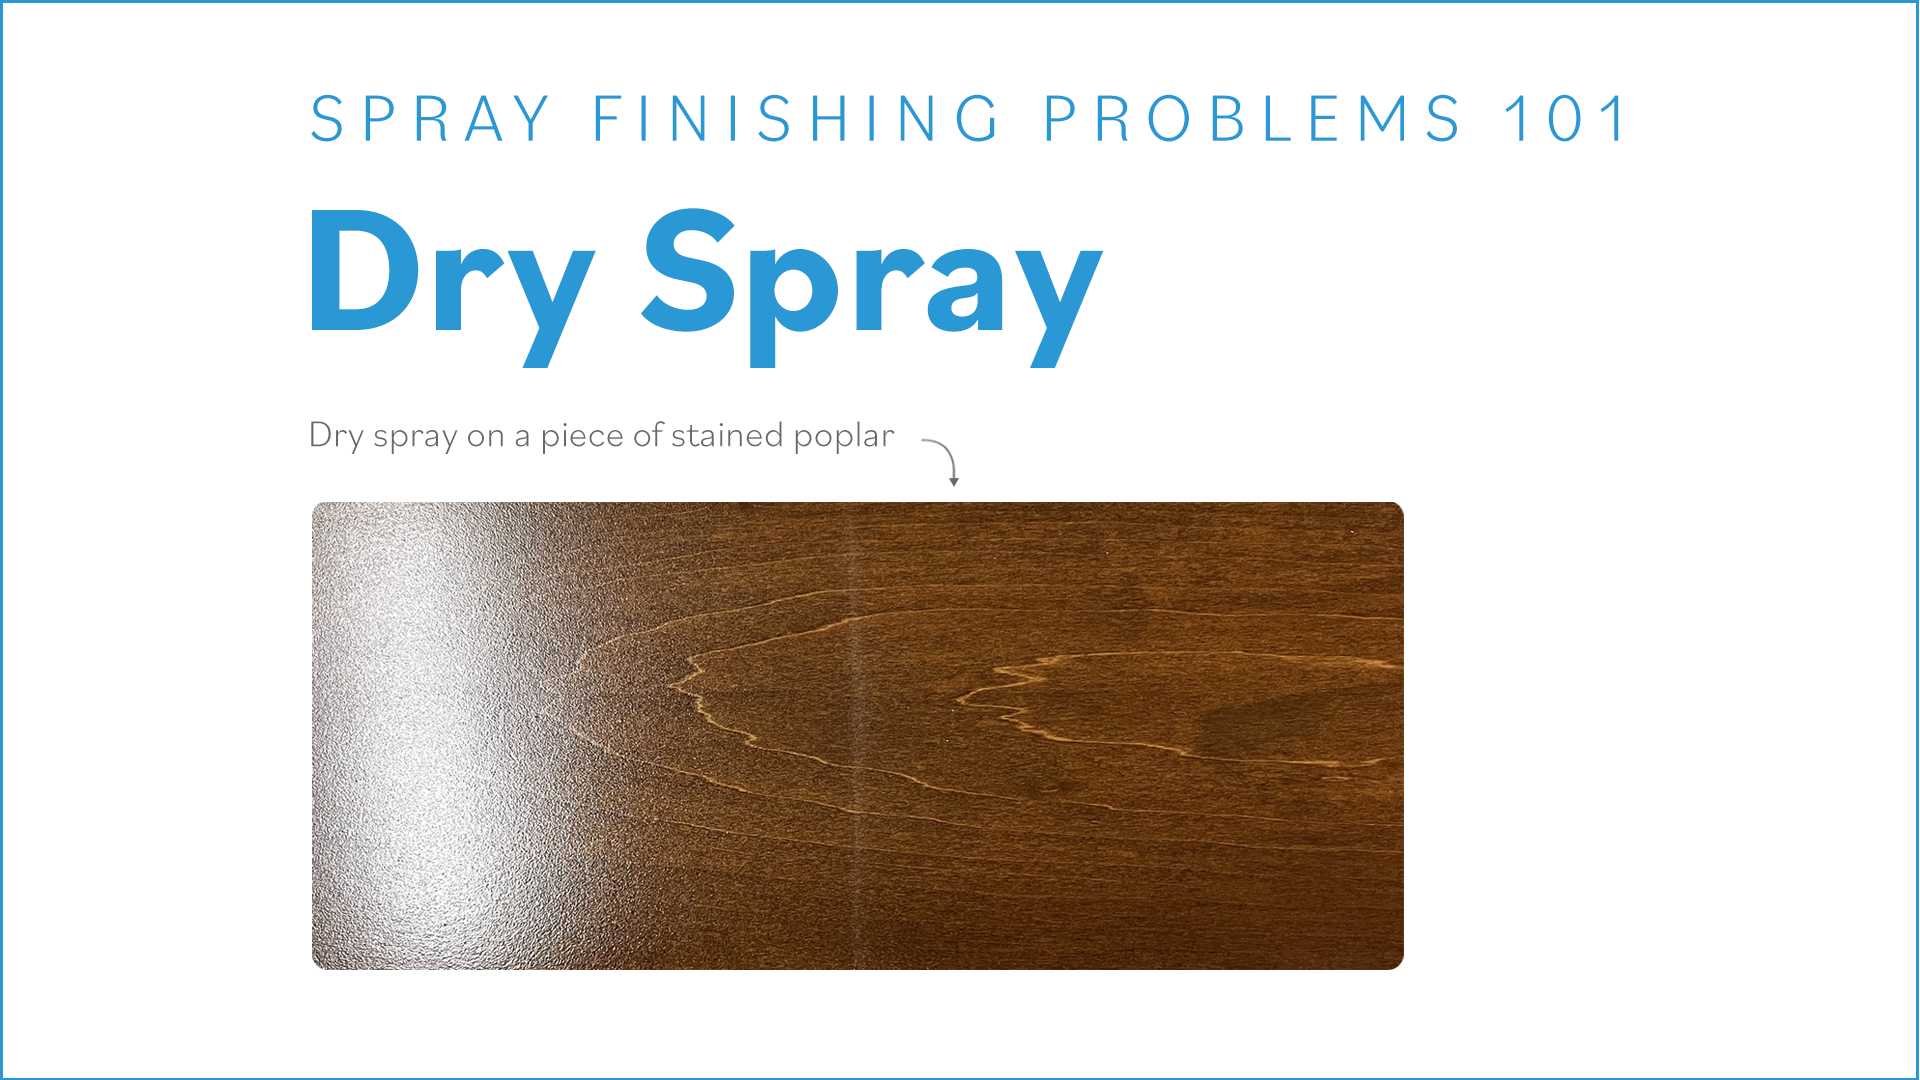
1. Identifying Dry Spray
If the surface feels gritty and a bit like sandpaper when you run your hand over it, odds are you’ve got dry spray. And it may be confined to only one area of an otherwise perfect piece.
2. Dealing with Dry Spray
Depending on where it is on the piece of furniture and its severity, you have one or more possible solutions for dealing with it.
If it’s in a location where it’s going to be noticed or touched often (such as a chair seat or back, or a tabletop or its aprons) sand the area with P600 (or whatever the highest recommended grit for the finish) sandpaper and correctly reapply the finish. In most cases you shouldn’t have to sand beyond the problem coat. Anywhere else, and you have the option of waiting until the finish has fully cured (usually 70 hours) then rubbing out the area with 0000 steel wool.
Conversely, if it’s an important piece or you want to have it perfect, then by all means, follow my previous advice and reapply it.
3. Understanding Dry Spray
There are three causes of dry spray – thin coats; spray distance and overspray.
The coat has been applied so thinly that it can’t flow out and level itself on the surface.
This is most often the case when using a new and unfamiliar finish. The corrective measure is to ensure you’re applying enough finish per coat. So the next time around, quickly confirm the thickness of the still wet coat using a wet mil gauge. If it’s too thin according to the finish manufacturer’s TDS (Technical Data Sheet) for that finish, immediately spray another coat, oriented at right angles to the problem coat. Remeasure the wet film thickness. Once it’s dry, check again for dry spray, as there’s a possibility there may have been too much time between applying the initial and corrective coat. Because you had to add a corrective coat, the finish is telling you you’re not applying enough finish per coat.
There are a few different things to correct: a) you may have been moving your spray gun too quickly across the surface; b) your spray gun’s fluid control knob wasn’t set to provide enough fluid; or c) the needle/nozzle/air cap set is too small for the finish and is overly limiting the amount that may be applied.
The spray gun was held so far away from the surface that some of the atomized particles (usually those towards the outer area of the spray pattern) are nearly dry before they touch down, thereby contaminating the surface.
As a general rule of thumb, 200mm, or 8”( the approximate distance between the tips of your extended thumb and small finger) is the recommended distance, as measured from your aircap to the surface
Some overspray has landed on another area further away from your intended spray area that was still drying.
Some ways of dealing with dreaded overspray is to ensure you follow some key strategies, such as properly supporting the workpiece; spraying in an enclosed space with adequate airflow; finishing prior to assembly; and spraying the most important pieces last.
Summary
Spray finishing is one of the most efficient, flexible, and consistent methods for achieving the highest finish quality. But when things go poorly and a problem crops up, it’s nice to know that you’re in good company. I’m hoping that this mini-series on finish problems will keep them from happening to you… and help get you back on track whenever they trip you up.
Stay tuned for the next installment in this series of spray finishing problems — focusing on orange peel. In the meantime, if you have any questions or comments on this topic, or if there’s another topic you’d like me to write about, let me know. I’m here for you.