


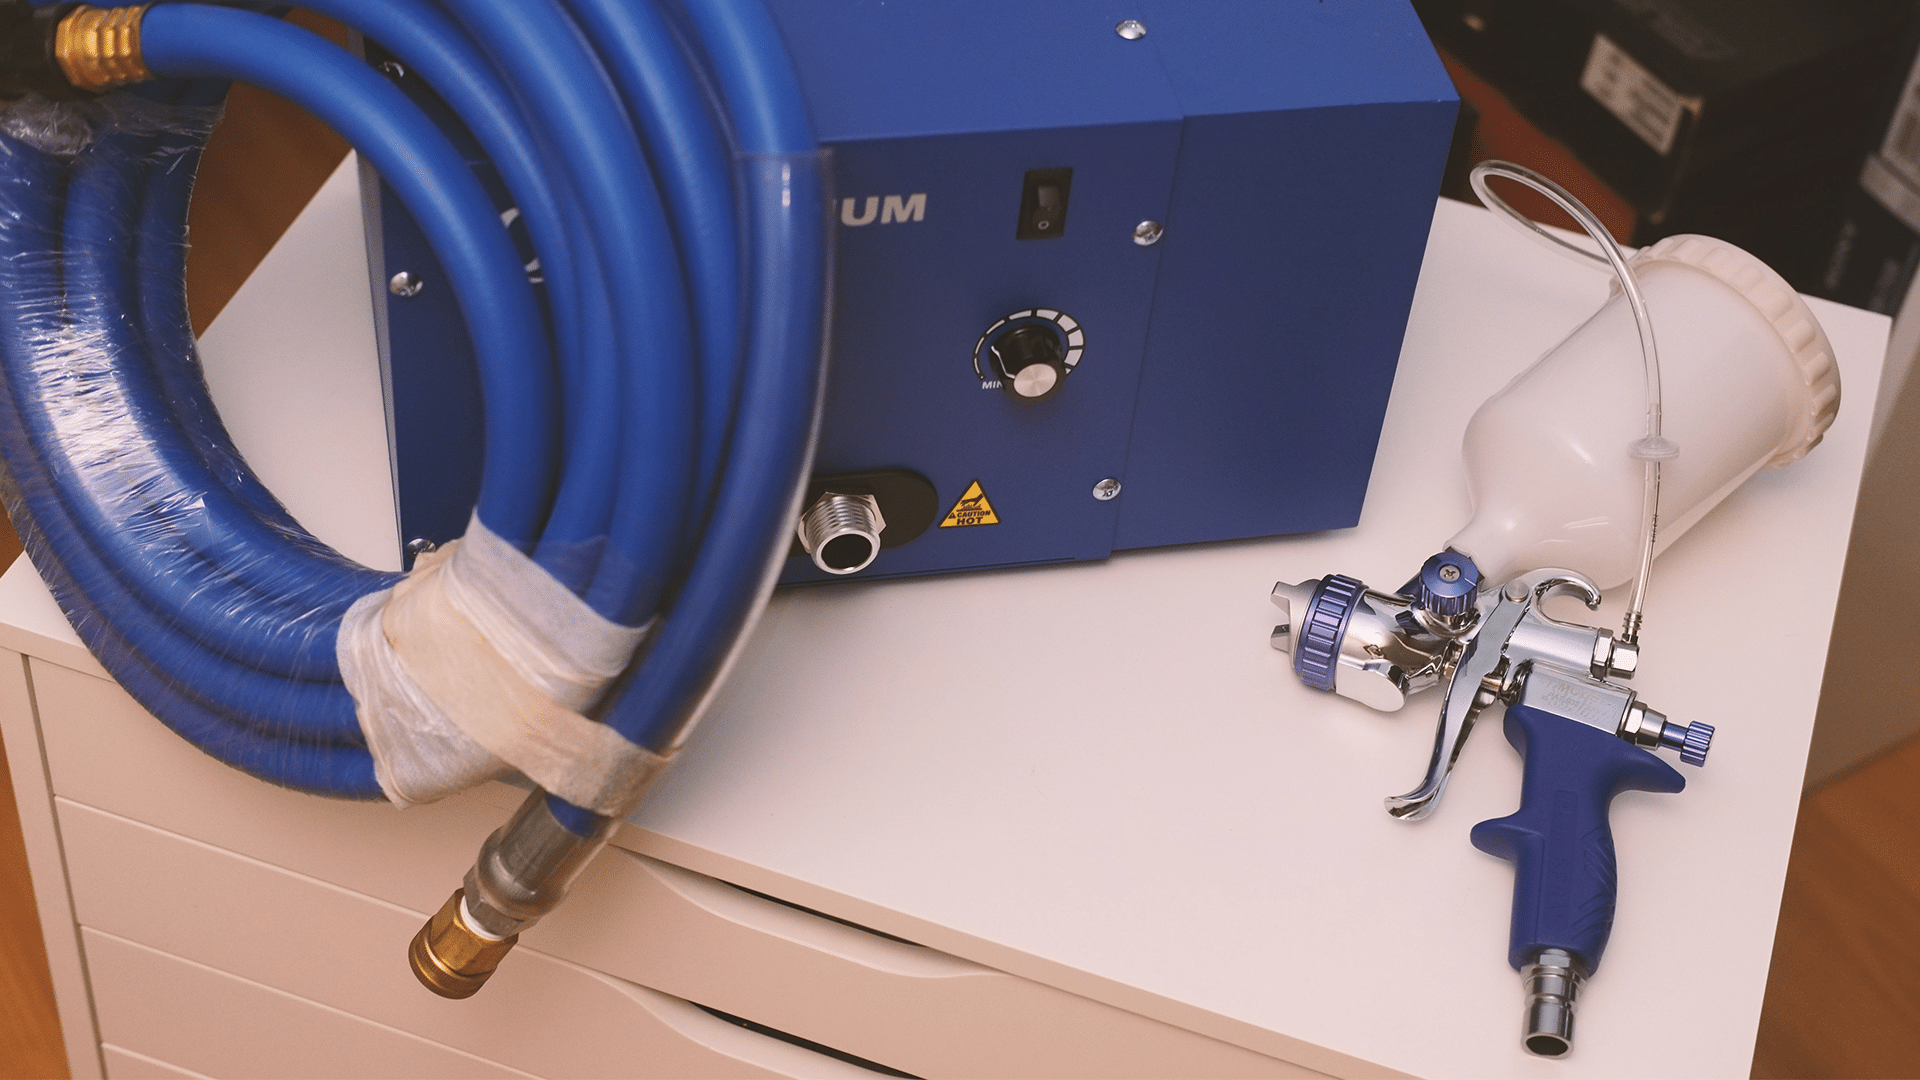
Setting Up a Turbine to Spray
A turbine spray system is a different animal than a compressor-based system and can be intimidating if you’re not familiar with the features.
Let’s run down the typical components and do some quick checks and adjustments to get ready to spray with a turbine spray system.
If you follow these steps, you’ll quickly become a convert – due to the multiple advantages turbine sprayers enjoy over compressor-based systems.
No Paint in the Hose

The first thing you’ll notice about a professional turbine spray system – there’s no paint in the hose.
In fact, the large hose that attaches to the turbine unit is actually an air hose. It supplies clean, warm air to the HVLP spray gun, with no need for an oil or water trap commonly found on air compressors.
Since there’s no paint in the hose, cleanup is much quicker compared to an airless paint sprayer or traditional pressure pot setup.
Install the Hose

Thread the air supply hose onto the turbine unit. Tighten the fitting until it’s finger tight, and then perhaps ¼ turn further with a wrench.
There’s a joint in the fitting to allow some rotation during normal use, and prevent any kinks in the hose.
Air Valve for More Control

An inline air valve is supplied with the turbine system to allow fine adjustments to airflow. While you could install the valve just below the gun, like a regulator on a compressor based gun, I prefer to place it between the main hose and the flexible whip hose.
Compact and Nimble

The flexible whip hose is 6 feet (1.8m) long, and much more maneuverable than the main air supply hose. Moving the air valve further up the line eliminates any bulk on the gun itself.
The quick-connect fitting is very compact, and doesn’t add any appreciable length where it attaches to the HVLP spray gun.
Prepare the Unit

Make sure a clean filter is installed in the turbine system.
The Q5 Platinum uses one filter, which installs with a friction fit from the bottom of the unit. Luckily, no tools are required to change the filter.
An added benefit – the filter is washable

Simply rinse it in warm, soapy water to clean. Just make sure to dry the filter thoroughly before putting it back in service.
Having a spare filter or two on hand will prevent any downtime.
These durable air filters are more cost effective than other units with replaceable paper filters, and can be cleaned many times before replacing.
Match Air Cap Set with the Job at Hand

Both the T70 bottom feed pressurized gun, and the T75G gravity feed pressurized gun come standard with a 1.3mm air cap set installed.
That’s a great starting point for spraying several different finishes, but if you’re working with a very thin or very thick coating, you may want to swap out the air cap set.
REMOVE THE NEEDLE FIRST!
Let’s say you’re spraying some thin shellac, and decide a 1.0mm air cap set will work best. It’s of critical importance to remove the needle first when changing the nozzle.
Trying to remove the nozzle with a wrench (while the needle is still in the spray gun) can damage the needle. After removing the fluid control knob and spring, pull the trigger back slightly and slide the needle out the back of the gun.
Always Swap the Air Cap, Needle and Nozzle as a Set

Now that the needle is safely removed from the spray gun, you can remove the air cap. Next, use the included wrench to remove the nozzle.

Remember that you’ll change air cap, needle, and nozzle as a set.
Each component is designed and manufactured to work specifically with the other parts in a set. Fluid volume and fine atomization won’t perform as expected if you only change part of the set.
Don’t forget to switch out all three components!
Adjust Fluid Control Knob

Some spray guns have multiple knobs on the back of the gun. Luckily, the T series spray guns have only one knob on the back, so there’s no mistaking it. That’s the fluid control knob.
Turn it in clockwise to limit the range of motion at the trigger and decrease fluid output. Back the knob out counterclockwise to allow more fluid output.
I usually start at the point I begin to see blue threads on the fluid control knob, then three half-turns clockwise.
That’s usually a good starting point, and fine adjustments can be made once you’re spraying.
Adjust the Fan Pattern

The fan width control knob is another one you can’t miss. It’s the oversized blue anodized knob, conveniently located on the side of the gun.
I will say this knob is sensitive though. A small adjustment in the knob position makes a big difference in the fan pattern.
Anything from a small circular spray pattern for spindle legs, all the way to a wide fan pattern for tabletops is possible.
Just make sure to reduce the fluid output for very small fan patterns to avoid runs in the finish.
Variable Speed Control Dial

The Fuji Q5 Platinum is one of the few turbine systems on the market with variable-speed fan control.
With this simple knob on the front of the turbine, you can precisely adjust fan output (PSI) for the coating you’re spraying.
Thicker, more viscous coatings require more pressure to spray. That’s no problem for the Q5. Just turn the dial up until the finish atomizes for a perfect off-the-gun finish.
Need to spray thin shellac, stain or dye? No problem! Just back off the variable speed control dial until your finish lays down nicely with minimal overspray.
Ground Control

Always operate the turbine unit on the ground, and never on a workbench or cabinet, for optimal results. Although the Q5 is a solid package with quiet engineering built-in, it’s still fully portable with a robust handle and on-board gun holder.
Ready to Rock

Make sure your spray gun of choice is connected to the quick connect, and toggle on the power switch. The current line of HVLP guns for Fuji turbines includes the T70 bottom feed, T75G gravity feed, and unique swivel-cup G-XPC model… all with pressure feed for maximum versatility.
Final Adjustments


Double-check your fan pattern on a piece of craft paper. Once you achieve a nice oval fan in the desired size, you’re all set! Nothing matches the finish of an HVLP turbine system, and since there’s no paint in the hose, cleanup is a snap.
In fact, cleanup is so easy on these modern turbine based spray guns, I reach for my spray rig on projects big and small. You can officially retire the paint brush and rag, and join the modern age with a quiet and reliable turbine system from Fuji.