


Spraying Tips and Pointers
Some of the keys to successful spraying are really quite simple, but you need to have some forethought in laying out the parts and preparing to spray.

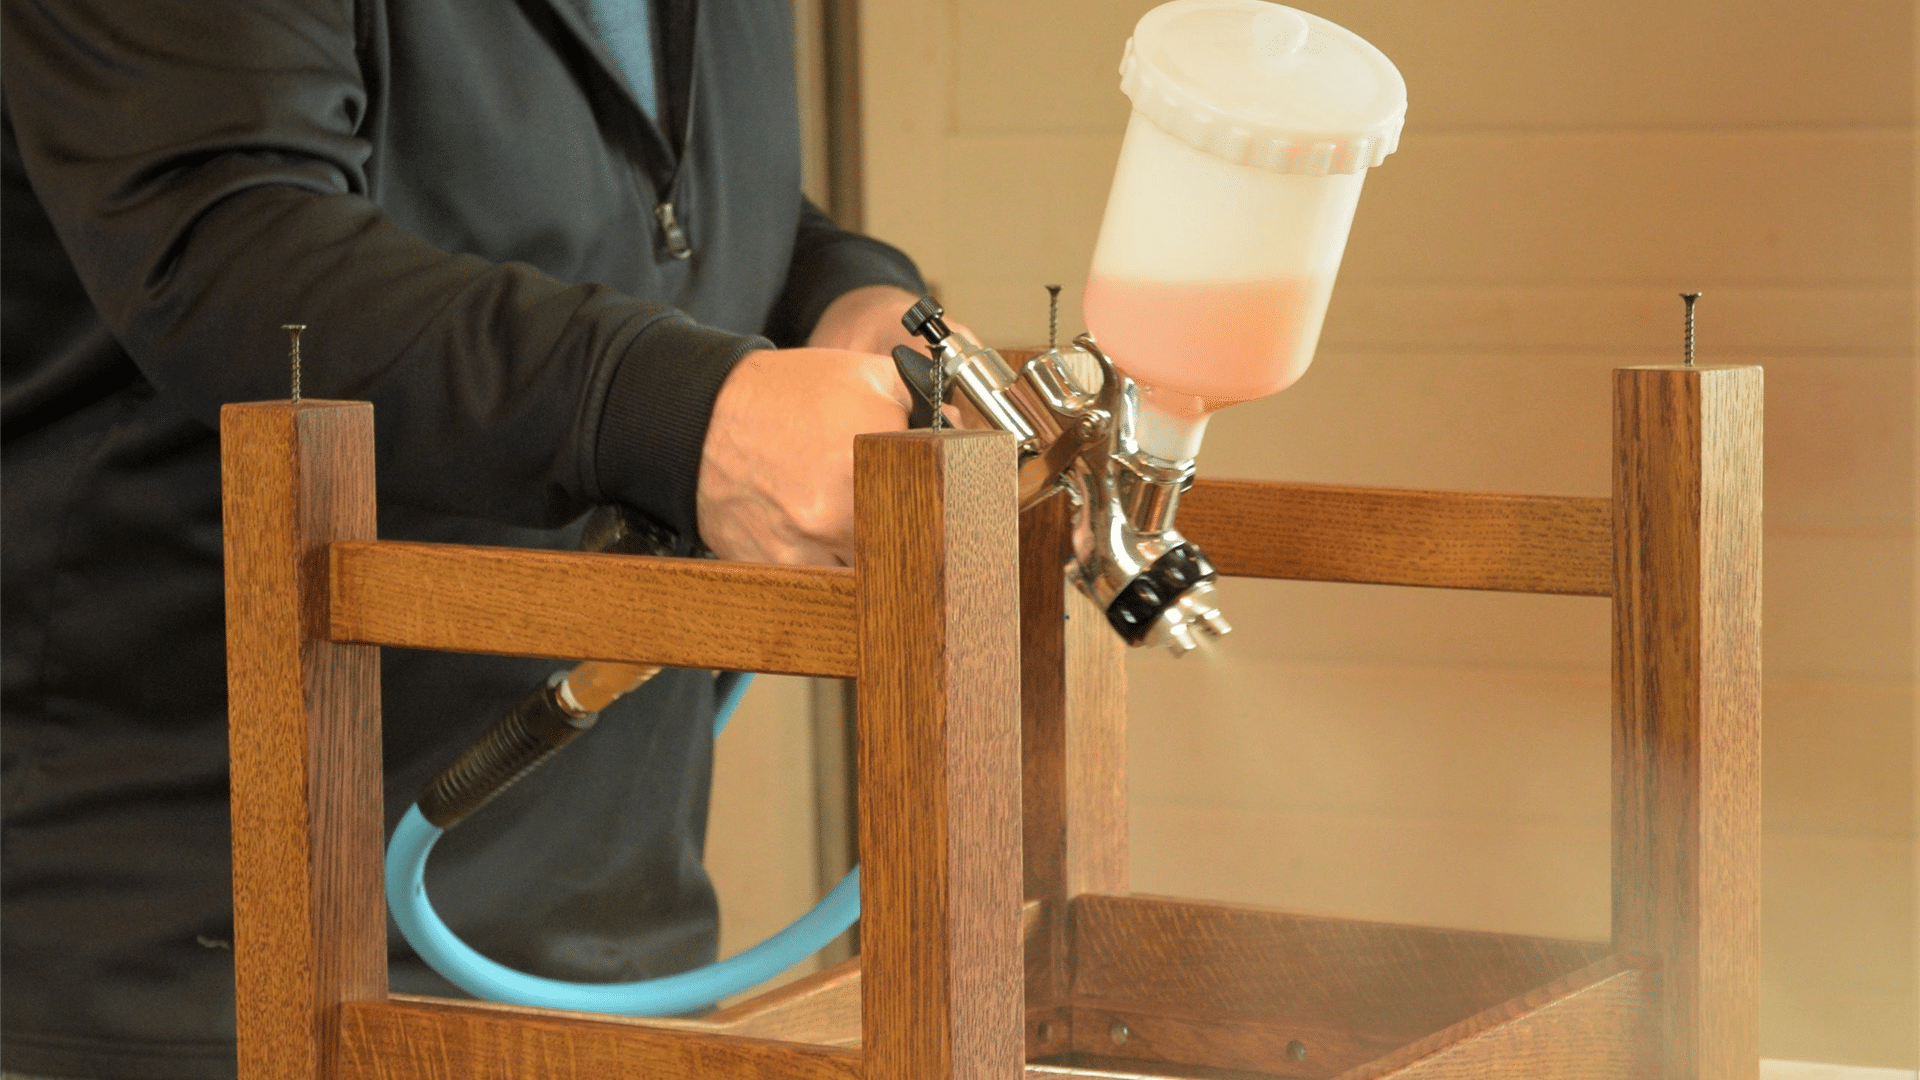
Projects often need to be elevated off the workbench on screws or painter’s pyramids.
This allows you to spray the undersurface of the project, flip it over and continue spraying – with no need to wait for the first section to dry. Here, drywall screws have been temporarily inserted into the legs of an ottoman for just this reason.
Plan out your spraying sequence in advance.
Each project will have unique challenges, but generally I try to start spraying with the project upside down. I’ll set the project on some drop paper, and coat the underpinnings first.

For cabinet doors, I’ll generally lay them face-down on thin strips of wood. I focus on getting good coverage on the back face of the doors for now.
If the edges of the doors are a little dry, that’s ok. It actually makes them easier to flip over for the next step.

Now flip the doors over on painter’s pyramids.
The reason I don’t ever put workpieces face-down on these finishing points is they can potentially cause dents and dings. But if you’re careful not to press down on the parts, they let you continue working on the front of the cabinet parts, with no downtime.
Once the parts are flipped over, start with the edges, and finish by laying a nice smooth coat over the frame and panel.

Hold Everything – There’s a Flag on the Play.
Before we get ahead of ourselves, it’s worth mentioning that the stain needs to dry for 24 hours.
Cured stain that’s ready for a topcoat should feel dry to the touch, not tacky. If your shop is cold, or if the relative humidity is high, drying times may take longer. But generally, if you wait overnight, the stain will have adequate time to dry.
This is the single most common mistake I see new finishers make:
They wait an hour or two, and start applying the topcoat too soon. This leads to a host of problems that could be easily avoided by simply letting the stain dry fully.
The same rule applies to topcoats… let each coat cure fully. Although, the timeframe varies greatly depending on the product used. The pre-catalyzed lacquer I often use actually cures in less than 30 minutes. By contrast, some oil-based polyurethanes take 1-2 days for each coat to dry!

Disassemble and clean your gun after each coat
It only takes 2 minutes, and 2 fresh ounces of lacquer. There are plenty of finishers that don’t do more than a cursory cleaning between coats. That’s fine if it works for them. My philosophy is I want the gun to spray exactly the same each and every time I use it.
With that goal in mind, a quick and easy cleaning makes sense, and prevents any problems before they start. Check out a short video “2 Minute, 2 Ounce Spray Gun Cleaning Method” on my YouTube channel The Thoughtful Woodworker.

It’s okay to give the front of the gun a quick dip in thinner, but don’t ever soak the whole gun.
It’s not necessary, and it removes internal lubrication from the gun.
Speaking of lubrication – remember to add a drop or two of approved oil near the front of the needle as you reinstall it.

Clean the air vent in the fluid cup lid.
This is particularly important if your HVLP spray gun doesn’t have a pressure assist tube. Clean this passageway as a part of your regular spray gun maintenance.

Rack it!
If you’re using a gravity feed spray gun, you’ll want to have a couple gun racks to support your sprayer when not in use. I like to have one wire-frame rack screwed to the countertop of my spray area. This is a great docking area to refill the fluid cup.

The other type of rack is a freestanding design, and I like to keep one of these in the area I’m working.
You can quickly rack the gun to free up your hands to flip workpieces as you proceed with your work. This type of HVLP spray gun rack doesn’t need to be attached to the workbench, and will stand on its own. I stuck a large magnet to the bottom of my rack to add some weight. This prevents the holder from sliding around in regular use.

Filter Everything That Goes into the Gun!
Whether you’re adding clear topcoat, or just a splash of thinner to the fluid cup, always have a filter to strain the material. You’d be surprised what contaminants are present in even a new metal can of lacquer thinner.
Prevent any problems before they start by filtering absolutely everything that enters the cup.

Have a safe place to store your spray guns when not in use
I store mine in a dedicated cart with foam liner in the drawer. Spray guns are an investment, and we should treat them accordingly. Stow your clean, dry HVLP guns and they’ll be ready for service the next time you spray.

Quality spray guns have optional accessories like different sized air cap sets
These include matching needle, nozzle and aircaps for spraying finishes with a variety of viscosities. Store these important parts in their specialized cases. They’ll protect and separate the parts in individual foam recesses, to avoid any damage.

A word about respirators and ventilation
It’s not enough to wear a dust mask to spray wood finishes. You’ll want to don a respirator equipped with cartridges approved for organic vapors. Luckily, they’re widely available and reasonably priced. Wear the respirator for both oil-based and water-based finishing.
Beyond that, always work in a well-ventilated area. In a shop setting, this usually means working with a man-door open with fan extracting fumes on one side of the workspace. On the other side, there should be a garage bay door open for cross-ventilation.
Work smart, work safe, and give spray finishing a try!